Build your Own 3 PIN Programming Cable
BTech, QYT, etc Mobile
by John 'Miklor'
K3NXU
A simple project with great results.
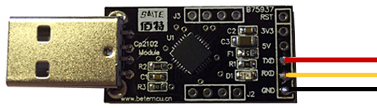
The heart of the project is a $2
CP2102 USB to TTL UART board. |
|
|
Let's See...
You purchased a
BTech or QYT Mobile and now your ready to start programming it
using software. You now need to make a simple
choice. Buy or Build. Here's a simple project that will
not only save you a few dollars, but give you the
satisfaction of building it yourself.
This project uses a USB to TTL UART board with a CP2102 SiLabs chip. These boards are available on
Amazon and
eBay for around
$2.
The component list is very basic:
- CP2102 USB UART Board
- 3' piece of 3 conductor wire
- 3 Pin stereo plug
- (2) 10K ohm resistors
The Project
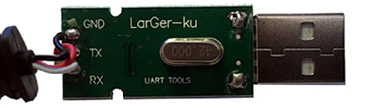
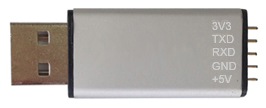
Let's first take a look at a typical CP2102 board. It's
pretty straight forward. USB on one end, a few
connection points on the other.
The output terminals we are interested in are:
TXD - Transmit Data
RXD - Receive Data
GND - Ground
Note 1: (Connection Pins)
Most boards have pins on the back requiring small connectors. You can either remove the pins or solder to them. Whatever floats your boat. I personally prefer removing the pins and soldering directly to the board.
Now it's just a matter of connecting to the proper pins
to the 3 Pin Stereo plug.
Note 2:
(Labels Reversed)
Some boards may have the TxD and RxD labeled in reverse. If it doesn't work the first time,
don't panic. Just reverse the two wires on the CP2102
board. No damage has been done.
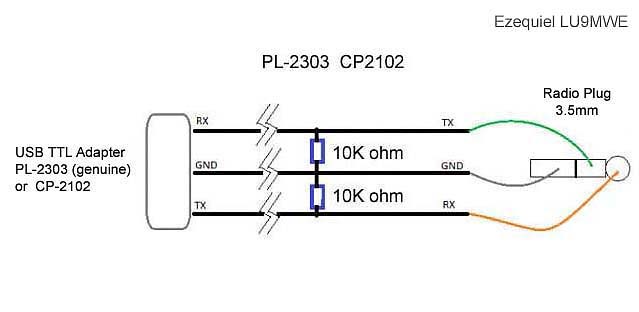
Adding 2 resistors
Ezequiel Welcomme LU9MWE (Argentina) brought to my attention
that some models only work with the original cable
(Chinese). Using an aftermarket or homemade cable may
result in the radio cycling or pulsing when trying to communicate with the
software.
The solution is to place a reference to GND in the communication lines. This is done by
adding two 10K ohm resistors. One between GND - RX, and the other between GND - TX.

click to enlarge |
Driver
When you insert the new board into the USB port, give
Windows a chance to find and load the new driver. This
should take about 30 seconds. When it says Driver Found,
you're done.
If Windows is setup to block automatic updates, SiLabs
drivers can be found at
SiLabs. All drivers seem to
work fine.
That's it...
Three wires from the board, three
wires to the connector. The key is knowing proper pin
assignment.
Now, let's say you want to get fancy. Maybe you have an
old programming cable in the drawer that doesn't work,
but like most hobbyists, you just couldn't bring
yourself to throw it away. Or, maybe to make it
cosmetically pleasing, you decide to buy one of the $3 specials,
just to have the USB case and wire. Here's how you would
mount it.
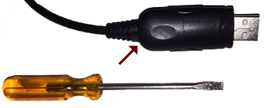
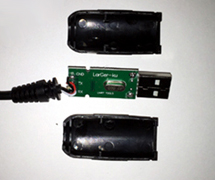
Let's start with that original cable.
Take a small screw driver and carefully pry the case open from
the back where the cable enters. Once the back is
opened, pry the case open evenly around the sides.
It should only be snapped together.
Unsolder the 3 wires connected to the old board.
GND is Black, TxD is Red, RxD is White or Yellow.
Clip off the old connector and insert the wires in the
RJ45 shown above.
Retrofit
Due to the slightly larger size,
the board shown above
may require a Dremel tool, XActo knife, Glue, and some
patience, but it can be done.
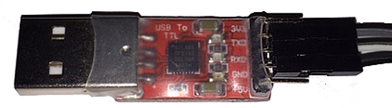
For a dollar more,
I very highly recommend using the 5 pin CP2102 board shown below. It
still has the needed GND, TxD and RxD, but is a bit shorter,
narrower, and fits with no issue. It may
cost a few pennies more, but well worth it.
Some come protected with a piece of clear heat shrink over the board so you can see the cool blinking lights.
This plastic can easily be removed.
You can find the same boards in
a
metal case.

Inside the metal housing.
Look familiar?
|
What's the Advantage
- First and Foremost, it works. Now you can program
using software.
- Next, it only cost around $2. Add $3 for a cable and case
- Very Important - Bragging Rights. Now, when you go to a
club meeting and tell them they can build their own, just as you
did.
I hope you had fun with this project. It's super simple
and very rewarding. I've made several and never had a
failure.
|
|
|
|
|